I was flipping through one of my students sketchbooks and I came across an entry in which she defines and explains what her art is to her. I was touched by it. One of the hardest challenges I have had teaching children is to get students to talk about art and how it impacts their lives.
I decided to present this question to all of my sixth grade Please define art. Students answered this question in their sketchbooks. I let them use any supplies they asked for . More to come...
A blog about teaching art in a middle school in New York City. Mrsteachart has been a visual arts teacher since 1996. This blog is a collection of lessons, ideas and stories from the art room. I have found , created and borrowed ideas from many places so Thank you and please feel free to use these ideas in your room. Create!
Sunday, November 21, 2010
Saturday, October 30, 2010
Sketchbook Assignment- Shading
This week students worked on a sketchbook exercise that focused on shading. Students traced simple shapes in their sketchbooks using a variety of stencils and templates. Afterward, they shaded each shape from dark to light.
Day of the Dead
This week in art class we have been studying Day of the Dead . The seventh grade students were very excited about the symbolism of Day of the Dead and the prospect of learning how to draw skeletons and skulls. I created a reference a package for each student that had copies of Day of the Dead art as well as some step by step directions on how to draw skulls.
The art students first created sketches inspired by Day of the Dead art in their sketchbooks. After they were satisfied with their sketches they transferred their images on to black 12x18 paper.
The first day painting the students were only given white tempera paint in baby food jars. I wanted my students to think about positive and negative space. Also I wanted then to realize that sometimes while painting it is important to learn to wait for the paint to dry in order to achieve a desired results. During the second day painting students were allowed to add color, students used palettes to mix their own paint. On the third day students embellished their work adding glitter, feathers and other collage materials.
Here are some helpful links:
http://www.teachervision.fen.com/mexico/resource/5616.html?detoured=1
http://www.questconnect.org/oaxaca_lesson_plans.htm
http://www.azcentral.com/ent/dead/articles/dead-education.html
Saturday, October 16, 2010
Kaleidoscope Inspired Designs
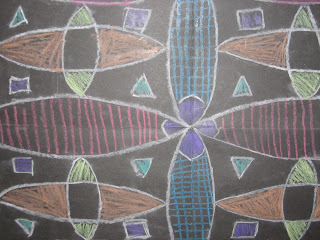
My seventh grade classes made designs inspired by kaleidoscopes. I brought in a kaleidoscope so that they could see the mirror image effect. I was surprised by how many students had not seen one before.
Materials: black construction paper 12x18, chalk, construction paper crayons
Procedure:
1. Fold the paper in quarters
2. Create a design in one quarter using chalk
3.Refold the paper and press on the back of the deign to transfer the chalk lines.
4. Repeat this again until the design has been transferred to all quarters.
Students might have to reapply chalk lines.
5.Color the design using construction paper crayons.
6 Have students focus on repeating patterns with line and color.
Thursday, October 14, 2010
Sketchbooks
This year is off to a great start. All classes have their sketchbooks and have been working not only in class but at home. Yesterday during lunch duty I saw at least 20 students sketching away and I was proud. The sixth graders designed their next birthday cake and the seventh graders designed their Halloween costumes. The advanced portfolio students drew their hands and are to sketch three autumn leaves. Their enthusiasm is contagious.
Subscribe to:
Posts (Atom)


